Notes on Good Riveting
Preparation:
- Materials deburred on edges;
- Holes laid out in correct locations, taking into account pitch and edge distance requirements
- Holes centre-punched using a backing plate to avoid sheet distortion;
- Parts assembled securely together and supported while being drilled with a sharpened bit of the correct size. Holes drilled squarely to
surrounding surface.
- Parts disassembled and holes deburred;
- Holes dimpled or countersunk if accepting AN 426 Flush head rivets.
- Parts reassembled and clecoed;
- Selection of new AN rivets of correct diameter and length;
- Assembly well secured in a vice, a jig or on a workboard.
Tips:
- Before beginning a new phase, try rigging a test piece or a component mock up. Cardboard mock ups will conserve material and will help to obtain correct sizes and shapes.
- Setting the first rivets of the day should be done on a test piece to ensure proper air pressure; tool adjustment; and operator currency.
- Place masking tape on rivet sets to stabilise them while riveting. (renew frequently)
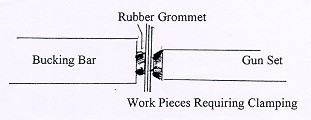
- A rubber grommet placed over the rivet tail will compress components together ensuring a close joint as riveting progresses. Use where clamps or clecoes are impractical.
Rivet Gun
Rivet gun should be lightly oiled (air port and inner shank of set) daily before work commences. Set should be securely attached with retaining spring in place. It should then be tested on a firmly secured piece of wood. This will confirm its operational status and will alert the operator to any alterations necessary (change in air pressure; wrong size set, etc).
A rivet gun should not be fired:
ˇ¤ without a set secured by a retaining spring
ˇ¤ without an intended target firmly in place against set and without ear and eye protection
A rivet gun should be disconnected from the air source when:
ˇ¤ Sets are being changed
ˇ¤ Maintenance is being carried out on gun
ˇ¤ Gun is not being used
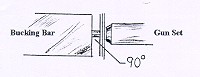
Gun set
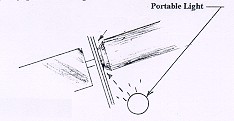
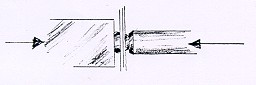
Rivet gun set is correct for the size of the rivet and is positioned at 90 degrees to the work surface. With universal rivet sets, the reflection of the gun set in an aluminium surface will give the impression of a continuous straight line with the gun set itself if positioned at 90 degrees. Also, light reflecting from the edge of the rivet head will appear as an even line around a properly positioned gun set.
Bucking bar orientation
1. Rest bucking bar on inserted rivet and try to locate its point of balance.
2. With gun set in place, use bucking bar to push rivet (and gun assembly) outward. Bucking bar will then register at right angles to the rivet as it comes to rest on the aluminium.
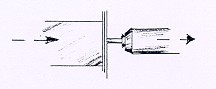
3. Push rivet back into place with gun set and reposition bucking bar, if necessary, to maintain its point of balance on the rivet. (repeat steps 2 and 3 until point of balance is determined). Often the index finger can be placed on the back of the bucking bar directly opposite the rivet tail. It then becomes the 'sensor' for correct bar position.
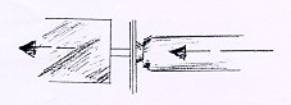
4. Pressure is held on gun while riveting. Bucking bar is held with only moderate force (otherwise rivet may be set with head proud of surface). A rubber grommet may be used over the rivet tail to assist in squeezing parts together during riveting. It acts as a 'pressure plate'

5. Duration of riveting is determined by experimentation with a test piece or previous experience.
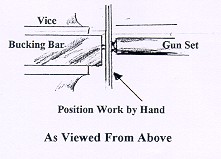
Bench Riveting
Often components are more easily riveted as sub-assemblies (off the airframe). A workbench allows components to be positioned and secured optimally for joining.
The bucking bar may be secured in a bench vice and, with the components positioned by hand, rivets are set with a gun held in the other hand. The main advantage here is that the bar is stationary and the components may be more easily held and positioned for riveting.
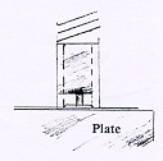
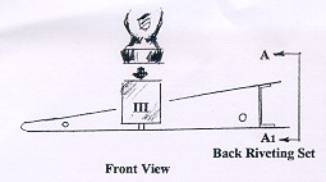
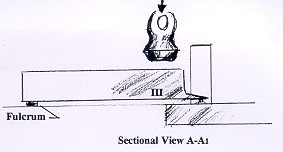
Back Riveting
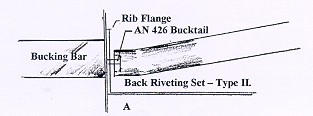
Back riveting is a method of setting rivets, usually in a skin component, by striking the buck tails with a special gun set while the flush head is securely supported in its dimple or counter sink by a steel plate or bucking bar.
Control surfaces are usually back riveted using a horizontal steel plate mounted on a table. The skin rivets are held vertically in their holes with thin Scotch Magic tape or fine Mylar tapes over the heads. The internal rib or stiffener is placed over the rivets and the special gun set is used to sequentially set these fasteners. Note: try using all RV-Workshop Learning centre back riveting sets.
Type I
Type II
Type III
If the builder is working alone, sometimes it is difficult to judge when the backriveting set/gun is square to the surface being joined.
Solution:
1. Using shims, level the back riveting plate on the table.
2. Using a drill press, drill a half inch hole almost through a 4" x 4" x 2" piece of hardwood.
3. Mount a straight universal head rivet set in riveting gun.
4. Use Vaseline to push the end of the set into the hole in the hardwood.
5. Place the hardwood on the leveled surface plate so that the gun is supported vertically.
6. Secure a round bubble level vial to the butt of the rivet gun with RTV or a silicone adhesive.
7. Make sure the vial is positioned so that the bubble is in the centre.
8. Secure the assembly so that it cures in that position overnight.
This will aid in setting perfectly aligned rivets provided
ˇ¤ The back riveting plate is leveled prior to use;
ˇ¤ The gun is held with the bubble in the centre while riveting.
Note: It pays to periodically recheck calibration using the wood block and straight rivet set. The straight set is only used during calibration. The back riveting set is reinstalled for actual riveting.
Riveting with a Partner
There are places on RVs which cannot easily be riveted by one person. Main wing skins are a good example. This becomes a two-person operation, with one bucking and one riveting. The principles of good riveting are exactly the same, the only variable introduced is the co-ordination of two workers (and the advantage of two extra hands). As the partners cannot see what the other is doing, a system of verbal signals is used to direct operations. One which works is:
1. The riveter inserts a rivet into the prepared hole; positions the gun for setting and calls, "ready".
2. The bucker positions the bucking bar over the rivet tail and, if its position is correct, will call, "go". If the rivet is in an awkward position the bucker may want to slide the rivet out and in to determine its point of balance (as above). He/she will call, "out" while pushing the rivet out toward the riveter until the bar comes to rest on the aluminium. To reposition the rivet for setting the bucker will call, "in".
3. The riveter will firmly push the gun against the work and may also use the other hand to press the set against the work, if it is of the flush swivel type (see below). As the rivet re-seats this force pushes the bucking bar back into position. If the bucker is satisfied with the orientation of the bucking bar the call "go" is given.
4. The riveter then drives the rivet for a time determined by experience or a test piece. This interval is usually less than a second and is best remembered as a musical phrase, such as a drum roll.
5. The bucker will check the tail for quality and will call "next" if all is well and the pair can move on the next rivet or "again" if the rivet needs a bit more driving or "remove" if the rivet is not acceptable. The riveter marks the rivet for later removal with a felt pen.
Notes on Rivet sets for skin riveting:
If possible, skins should be back riveted. This process provides cosmetic (and some structural) protection to the outer skin. Some locations will permit access for use of the spring loaded (type I) back riveting set. On others, such as wing ribs, a special long back set having an angled face is used to back set rivets. In either case, a partner uses a polished, 3" diameter back riveting bar (plate) to buck rivet heads from the outer side of the skin.
The Swivel flush set mentioned above is a must when selecting aircraft riveting tools. Unlike conventional sets, the swivel set will maintain flush contact with the surface being riveted, despite small variations from vertical in gun position. This helps to prevent 'smiles' in the surface caused by a slightly cocked gun set. Also, the rubber outer boot around the set allows the operator's free hand to secure the face of the set to the work surface - this prevents smiles and it also prevents the gun from accidentally traveling off position. If the skin cannot be back riveted, normal riveting with a swivel set will help to maintain a similar quality.
The Grommet Trick:
A hard rubber grommet is placed over the buck tail of the rivet. The grommet should be slightly thicker than the length of the buck tail. As the bucking bar is compressed against the tail during riveting the rubber squeezes the components together until the rivet expands enough to secure them permanently. This is a useful technique when clecoes or clamps are impractical.
COLLETED BY KAREN FROM www.chinatungsten.com
ˇŞˇŞˇŞˇŞˇŞˇŞˇŞˇŞˇŞˇŞˇŞˇŞˇŞˇŞˇŞˇŞˇŞˇŞˇŞˇŞˇŞˇŞˇŞˇŞˇŞˇŞˇŞˇŞˇŞˇŞˇŞˇŞˇŞ
Chinatungsten Online specializes in manufacturing, sourcing, importing, exporting and worldwide distribution of tungsten products. With more than 20 years experiences of tungsten business, we are now the top professional Chinese company in the fields of tungsten ore, oxide ,trioxide, acid, powder, carbide powder, tungsten carbide cutting and drilling tools, tips, insert, wear part, rare earth, tungsten heavy alloy, tungsten wire & heater, tungsten arc welding electrodes and others about tungsten. We are very proud of our highest quality, best service and most competitive price. For any further technical info or pricing on tungsten, please contact us without any hesitation.
Email: sales@chinatungsten.com Tel: +86 592 5129696 Fax: +86 592 5129797
If you need any more details of the above news and/or products, please visit Chinatungsten Online, or contact us directly.
Disclaimer: The article is only reflecting the opinions of the author. We have no responsibility to prove the originality and authenticity of the content, words and/or pictures. You readers should just take it as reference and check the details by yourselves. And the content is not a suggestion for investment decision. The investor takes his or her own risks if he or she operates accordingly. If you have any dissent about the contents above, please contact the relevant author, or the webmaster. We will try our best to assist the dealing of the related issues. Thanks for your visit and cooperation.
|


